Showing posts with label COOKS. Show all posts

Sunday, April 24, 2011

BLT Pasta Salad


Miss me? Let's catch up over this cool and creamy pasta salad. Spring is in full swing here and the rising temperatures have me craving cool treats, crunchy veggies, and salad. But of course I couldn't keep it light and healthy, could I? This BLT version of pasta salad is tossed with 2 pounds of bacon and dressed with ranch and a hearty sprinkling of parmesan cheese. Oh yeah and there's spinach and tomatoes in there too- just to keep the illusion alive that you just might be eating something healthy.

BLT Pasta Salad
(printable recipe)

2 lbs. thick cut bacon
1 lb. bowtie pasta
2 pints grape tomatoes, sliced in half
9 oz bag baby spinach
ranch dressing
1/2 c parmesan cheese
pepper to taste

Fry the bacon until crisp and drain on paper towels. Bring a pot of salted water to boil and add the pasta. Boil uncovered for 11 minutes, until al dente. Drain.
Wilt the spinach 1 of three ways:
-Add to the still hot pot with drained pasta, cover, toss and let stand 10 minutes (this is what I did this time around)
-Wilt with bacon grease
-Microwave on a plate in 3 batches for 2 minutes
Combine pasta, wilted spinach, crumbled bacon, and tomatoes. Toss with enough ranch dressing to moisten to your liking. Sprinkle on parmesan and plenty of fresh ground pepper, mix well. Chill for at least two hours before serving.

Sunday, March 6, 2011

Tacos de Lengua (Cow Tongue)


The first time I tried lengua I was at an East Dallas taqueria with my uncle. I must've been around ten years old. He handed me a "beef" taco and I happily devoured every last bite. It was delicious.
Only after the fact did he inform me that it was lengua, and that lengua is actually cow tongue. Surprisingly I was unaffected and just wanted another taco. Lengua continues to be one of my favorite taco fillings and its always the first thing I try at a new taqueria. Here's how to make it at home.


Tacos de Lengua (Cow Tongue)
(printable recipe)

1 cow tongue (about 3.5 lbs)
2 onions, quartered
1 head garlic, cloves crushed
6-7 bay leaves
1 tsp. mexican oregano
1 tbsp. peppercorns
1 tbsp. salt
2 tsp. comino
2 tomatoes, diced
1/2 onion, diced
1 serrano, minced
2 cloves garlic, minced

Rinse the tongue and place in a large crockpot*. Add onions, garlic, bay leaves, oregano, peppercorns, salt, and comino. Cover with water and cook on low, about 6 hours.

Remove the tongue from the broth and set on a cutting board to cool for a moment. While its still warm peel off the skin. (Its easiest to start peeling at the back of the tongue and tug forward) Cut away the base of the tongue where it was attached to the mouth (this part is tough).

Slice the tongue crossways in 1/2" slices, then dice it. Sautee the tomatoes, onion, serrano, and garlic in a little oil until cooked through and fragrant. Add the cubed tongue and 1/2-1c of the cooking liquid. Season to taste with salt, pepper, comino, and chili powder. Simmer briefly to reduce the liquid.

Serve in corn tortillas with onion, cilantro, lime and fresh salsa.

*Alternately you can make this in a stockpot. Bring the water to a boil, add the tongue, onions, garlic, and seasonings. Reduce heat to simmer and cook about 1 hour per lb.


Monday, February 7, 2011

Candied Grapefruit Peel


Have you ever had candied citrus peel? Its a bit chewy, a little tart, and a little sweet. My kind of candy really, and I adore citrus- so there's that.

As a kid I remember my grandpa telling me about the citrus orchards in the valley. I was amazed that just a few hours drive away (Texas is a big place!) were orchards bursting with delicious grapefruits and oranges. I have yet to venture out to any Texas citrus orchards but I always enjoy their bounty each year. One of my favorites is the Rio Star grapefruit- its deliciously sweet and just a little tart, and the aroma of slicing into one is mouthwatering. This year after slicing and slurping my way through a giant, juicy Rio Star I wanted to do something more with this fruit, and before I knew it I was making Candied Grapefruit Peel. Read on for the recipe.

Candied Grapefruit Peel
(printable recipe)

1 large Rio Star Grapefruit
2 c sugar, plus 1/2 c
2 c water

Cut the ends off the grapefruit to make a flat cutting surface. Put one side down on the cutting board and proceed to cut the grapefruit in 8 wedges. Remove the fruit (eat it!) and slice the rind lengthwise into 1/2" slices. Place each slice rind side up on the cutting board, use a sharp knife to carefully cut away as much of the white as possible, this will keep the candy from being bitter. The peel should be almost transparent.

Place the peels in boiling water for 20 minutes. Drain and combine 2 c sugar and 2 c water over low heat. Stir until sugar is dissolved. Turn up the heat and bring to a boil. Add the peels and boil for 20 minutes. Use a fork or tongs to remove each peel from the syrup and dredge in sugar, coating all sides. Place on parchment to dry, about 20-30 minutes. If you'd like dip in dark chocolate!

Thursday, February 3, 2011

Home Fries


At the Goldrush Cafe where I grew up you can special order these fries. They are thick cut by hand with the skins left on and deep fried to perfection. Home fries are the perfect accompaniment to a juicy burger or a club sandwich, and they pack a real punch when you're craving fries. It doesn't get much better than these...well unless they're crinkle cut, or waffle, or shoestring... I have a thing for french fries I guess. Make these for now, and don't forget the jalapeno ranch for dipping.

Home Fries
(printable recipe)

russet potatoes
canola oil for frying
salt & pepper or french fry seasoning to taste

Now, there's a method for making these just right (assuming you don't have a deep fryer). It's a 3-part process:
First microwave your potatoes for 4-5 minutes each. We found that one potato at a time for about 4 minutes was just the right amount of time to precook. You want them to be easy to slice but will still hold their shape.
Then as each one is ready, cut into thick fries. You can cut these however you like but I prefer the fry to be the length of the potato and about 1/2" thick. Fry batches in hot oil until golden brown and drain on paper towels.
Once these are done bake in a single layer at 400 degrees until crisp, about 5-10 minutes. While they are still warm season with salt & pepper or fry seasoning (recipe below) to taste.

Serve with jalapeno ranch or your favorite dipping sauce. These also go great with steak!


French Fry Seasoning
(printable recipe)

2 tsp. seasoned salt (like Lawry's)
1/2 tsp. pepper
1/8 tsp. cayenne

Combine and sprinkle over hot fries.

Thursday, January 27, 2011

Hank's Roast Beef Sandwiches


Not many are aware, but my husband Hank is actually a really good cook. Its just that he rarely has a chance to shine seeing as how I'm such a kitchen-hog. I think he's accepted that cooking is a passion of mine and politely steps aside and happily eats anything and everything I make for him. Its a win-win.

But now and then I'm exhausted at the end of the day or just plain tired of being in the kitchen (it happens, I blame pregnancy). This month has been particularly uninspired, so I begged Hank to make one of my old favorites, these delicious Roast Beef Sandwiches.

Hank spent a few years as head cook that the Bagel Nosh in Arlington and learned to make a mean sandwich. This one is his adaptation of a classic roast beef with provolone and horseradish spread, its delicious on its own but I insist on the au jus for dipping.

Hank's Roast Beef Sandwiches
(printable recipe)

1 lb. thinly sliced roast beef
1 bell pepper
1/2 onion
2 cloves garlic
2 tbsp. butter
4 sandwich rolls, hoagies, or bolillos
6 oz. cream cheese, room temperature
fresh horseradish, or horseradish spread
1/2 lb. provolone
2 c beef broth

Thinly slice the bell pepper and onion, and saute in a bit of oil. Mince the garlic and add to the pan. Continue to cook until soft and fragrant. Remove from the pan and set aside.

Melt the butter in the pan and add the roast beef slices, separate the slices and toss them around a bit to brown. Meanwhile lightly toast the sandwich rolls and make the spread.
Combine cream cheese and add horseradish to taste, we like it to have a bit of a kick but not so much that its overpowering. Add a little at a time until you get to the right flavor.

Layer the sandwiches, spread the horseradish-cream cheese on both sides, add a slice of provolone, roast beef, and finally the bell pepper mixture. Add an additional slice of provolone over the top if you like. Put these in a warm oven to melt the cheese.

Meanwhile add the beef broth to the pan you cooked the meat in. Scrape the bottom to remove any tasty bits. Season the broth with a bit of pepper and kitchen bouquet. Serve the warm sandwiches with a small bowl of the broth for dipping. Have napkins handy.

Tuesday, January 18, 2011

Queso Blanco Burgers


A few months back Rebekah from Rebekah's House of Munch posted these amazing burgers. I could not wait to give them a try, a burger covered in queso? Yes please, and thank you.

These Queso Blanco Burgers have a few components but come together easily. The patty is spiced up with a bit of hot sauce, cooked to perfection, then covered with homemade queso blanco and topped with pico and sliced avocado. Definitely my kind of burger.

Now, as luck would have it my internet crapped out the day I planned to make these so I didn't follow the recipe exactly, but remembered most of it and improvised where I could, adding what I had on hand. Here's how they came together.


Queso Blanco Burgers
(printable recipe)
adapted from Rebekah's House of Munch

for the patties:
about 2 lbs. ground sirloin
1/4 lb. chorizo
3 tbsp. hot sauce (I like El Yucateco chile habanero)
2 tsp. salt
2 tsp. pepper
2 tsp. comino

for the queso blanco:
3 tbsp. butter
1/3 c diced onion
1 jalapeno, diced
3 tbsp. flour
1/2 c milk
1 small poblano, roasted and diced
8-10 oz. white american cheese, shredded
4 oz. monterrey jack cheese, shredded


pico de gallo
8 hamburger buns
sliced avocado

To make the hamburger patties combine the meat, hot sauce, and seasonings. Mix thoroughly and form into 8 patties. Grill outside or in a cast iron skillet on the stove. Set aside.

For the queso blanco saute the onion and jalapeno in half the butter until soft. Add the remaining butter, and turn the heat to medium low. Add the flour and stir together to form a roux. Slowly whisk in the milk until smooth. Add the poblano and shredded cheese, stir until combined, adding more milk to thin to desired consistency if needed.

Assemble the burgers. Place a patty on each toasted bun, top with warm queso, pico de gallo, and sliced avocado. Serve with spicy chichurritos.

Thursday, January 13, 2011

Potato Soup


Its been especially cold these last few days. The wind is relentless, not to mention the snow we saw over the weekend. Times like these call for desperate measures er... I mean delicious hearty soup. This rich and creamy Potato Soup fits the bill. I can remember this soup from when I was a kid, bubbling away on the stove, my dad made it every winter. Its always been one of my favorites.

This rich and creamy Potato Soup is slow simmered until the potatoes are tender and shredded cheese is stirred in for a boost of flavor. I love to top each serving with thinly sliced green onion, crumbled bacon, and an extra sprinkling of cheese. Serve up a bowl with a chunk of crusty bread, its comfort food at its finest.


Potato Soup
(printable recipe)

3 celery stalks, sliced thin
1/2 yellow onion, diced
4 cloves garlic, minced
2 lbs. white new potatoes
1 (10.75 oz.) can condensed cream of celery soup
1 (10.75 oz.) can condensed cream of broccoli soup
1 c chicken stock
3 tbsp. butter
1/2 c sour cream
2 c milk
oz. cheese (I use half sharp cheddar and half pepper jack), shredded

garnish:
thinly sliced green onion
crumbled bacon
shredded cheese

In a large pot cook the celery, onion, and garlic in 2-3 tbsp. of oil until they begin to soften. Peel the potatoes if you prefer, (I didn't) and dice into 3/4" chunks. Add the potatoes, soups, stock, butter, sour cream and milk. Stir well to combine and bring to a low simmer. Cover and cook for about 30 minutes, until the potatoes are cooked through and tender. My dad says to cook them till the edges are somewhat round. Add pepper and garlic salt to taste. Shred the cheese and stir into the soup, reserving some extra for garnish.
Serve hot garnished with green onion, fresh crumbled bacon, and shredded cheese with a piece of crusty bread.

Tuesday, January 11, 2011

Banana Bread


Seriously? I haven't posted this banana bread yet? I could have sworn I had already but I must've got caught up in wondering whether or not anyone would really be interested. You see, I've had a go-to banana bread recipe for some time. Its good but really nothing special, just one I'd always used from Meta Given's Modern Encyclopedia of Cooking. I'm sure you have a banana bread recipe or two, maybe from Grandma or a treasured cookbook, so why would you bother trying some other recipe?

Well I thought the same thing until I read this article in the Dallas Morning News. My mom had saved it for me, since banana bread is her favorite, and was eager to see if I would make the recipe given. The author had been in search of the best banana bread recipe, one that would yield a tender, moist, flavorful bread bursting with banana flavor. It sounded like a noble quest to me, knowing that the recipe I had was just mediocre. So without delay I whipped up the recipe given in the article, and I'm happy to say it has been my new go-to banana bread ever since. The sour cream adds just enough acid to give it a good rise, and the loaf is full of chopped walnuts and plenty of banana flavor. Its the perfect thing to make on a lazy weekend or anytime you have several too-ripe bananas hanging around.


Banana Bread
(printable recipe)
from the Dallas Morning News

2 c flour
1 c sugar
2 tsp. baking powder
1/2 tsp. baking soda
1/4 tsp. salt
1 1/2 c coarsely chopped walnuts
2 eggs
1 1/2 c mashed bananas (about 4 small bananas)
1/4 c sour cream
1 tsp. vanilla
1 stick (1/2 c) butter melted, and brought to room temp.

In a large bowl combine the flour, sugar, powder, soda and salt. Mix well and toss in the walnuts to coat. In a separate bowl beat the eggs, add the mashed banana, sour cream, vanilla, and butter. Stir well to combine.
Make a well in the center of the dry ingredients. Add the wet mixture and stir well until thoroughly combined. Pour into a greased 9x5 loaf pan. Bake at 350 degrees for 40 minutes. Cover loosely with foil if it seems to be browning too quickly. Reduce heat to 325 and bake about 20 minutes until a cake tester inserted in the center comes away clean.


You'll be happy to know that this recipe adapts rather well. Don't like walnuts? Substitute chopped pecans or chocolate chips. Want a peanut butter flavored loaf? Substitute peanut butter for half of the butter called for. Either way, this banana bread will be a hit.

Wednesday, January 5, 2011

Honey Bun Cake


I do my best to keep us from eating so many pre-packaged foods- sweets and snacks in particular. Hank and I successfully resist the oh-so-tempting Little Debbie snack cake display quite often, probably 95% of the time. We're determined. Even if it means one of us drags the other away by the arm like a 5 year old.
Its a reality we face.

But sometimes temptation gets the best of us. Every once in a while we'll grab a box of our favorite Little Devil indulgence- Hank likes Zebra Cakes and Oatmeal Cream Pies, while I'm a sucker for Nutty Bars and Honey Buns. And we snack to our heart's content, well almost. Most of the time we maturely ration our servings so as not to annihilate the entire box in one day.

So imagine my elation when I stumbled upon a recipe for Honey Bun Cake on Tasty Kitchen, I had to make this. And share it. There's no way I could let such richness sit in my kitchen for nightly snacking. This Honey Bun Cake truly hits the spot and definitely delivers on the honey bun flavor we all know and love. I, of course, could not leave well enough alone and decided that layering the cake with real honey buns would only make it that much more indulgent. And I was right. And I have the tight pants to show for it.

(My apologies to those of you starting New Year's dieting resolutions... remember everything in moderation, just don't give up cake!)


Honey Bun Cake
(printable recipe)
adapted from Tasty Kitchen

for the cake
1 box yellow cake mix
4 eggs
1 c sour cream
3/4 c vegetable oil

for layering
3/4 c light brown sugar
2 tsp. cinnamon
6 honey buns

for the glaze*
2 c powdered sugar
6 tbsp. milk
1 tsp. vanilla

*I made the whole batch of glaze, but it wasn't necessary and was a bit too sweet for my tastes. Next time I'll make a 1/2 batch and drizzle lightly over the top. A little goes a long way!

Combine the cake mix, eggs, sour cream and oil. Mix well and set aside. In a small bowl combine the brown sugar and cinnamon.

Grease a 13x9 pan, add half the cake batter. Top with half the sugar mixture and 5 honey buns. Press the honey buns into the batter a little. Add the remaining cake batter and spread evenly. Top with the remaining sugar mixture and nestle the last honey bun in the center. Bake at 325 degrees for 45-50 minutes.

While the cake is baking make the glaze. Combine the milk and vanilla. Gradually add the powdered sugar and whisk until combined. Pour over warm cake, allow the glaze to set for a 5-10 minutes before cutting.

Monday, January 3, 2011

Pimento Cheese


I blame Hank for getting me hooked on Pimento Cheese. Had I not married into his wonderful family I might have never tried it. Hank's mom, Betty Lou, makes the finest and she was kind enough to share the recipe with me a few years ago. Here is what I make from memory, sometimes adding a little variety with hot pepper sauce, garlic salt, or worcestershire.


Pimento Cheese
(printable recipe)

1/2 lb. longhorn cheddar cheese*
1/4 onion
2-3 tbsp. pimentos, drained of liquid
mayonnaise
salt & pepper to taste

*if you can't find longhorn cheese use a sharp cheddar

Remove the red wax and shred the cheese. Mince the onion very finely. Combine the cheese, onion, and pimentos, add enough mayonnaise to moisten the mixture and form a very thick paste. Mix well. Add salt & pepper to taste and chill until ready to serve. Tastes even better after a day in the fridge.

Hot pepper sauce, cayenne, garlic salt, or worcestershire can be added to taste if desired.


Pimento cheese is great on crackers, celery, or sandwiches. Serve to hungry, sweaty, brides on their wedding day with an ice cold negro modelo. (worked for me on my wedding day!)

Thursday, December 30, 2010

Black Eyed Peas & Southern Skillet Cornbread


I almost decided to make Texas Caviar this year, but put it off. Somehow cold, slightly tangy peas don't sound as appealing as a warm bowl of black eyed peas swimming with salt pork and jalapenos. So there's that. And there's the fact that I've been dying to have some cornbread. Cornbread, as I'm sure you know, pairs wonderfully with soupy black eyed peas.

Now I'll be honest, 75% of the time I use Jiffy. It comes in a nostalgic looking box, you add exactly 1 egg and about 1/3 c milk and, well, its ready in a Jiffy. Its delicious and exactly the flavor I remember from my childhood. And each little box of mix? Usually 39 cents at the grocery store- awesome. But every so often I get the hankerin' for good ole fashioned southern-style skillet cornbread made with bacon drippings (yum) and baked in a cast iron skillet for the perfect crunch along the bottom (double-yum). So this New Year's I thought I'd share my simple recipes for black eyed peas, for luck, and skillet cornbread, because you need this cornbread in your life.


Black Eyed Peas
(printable recipe)

1/2 lb. dried black eyed peas
6 oz. salt pork, diced
1/2 onion, diced
1 large jalapeno, sliced
1/2 tsp. ham base
salt & pepper to taste

Sort through the peas, removing any debris. Pour water over them to cover by about 3 inches. Cover and boil 15 minutes. Drain the peas and set aside. In the same pot add the salt pork and a little oil. Fry on all sides until it gets a little color. Add the onion and jalapeno, continue cooking until the onion is translucent.
Add the black eyed peas and 5 cups of water or chicken stock. Simmer until tender, season to taste and serve with cornbread.


Southern Skillet Cornbread
(printable recipe)

1 c yellow cornmeal
1/2 c flour
1 tsp. salt
1 tsp. baking powder
1/2 tsp. baking soda
1 c buttermilk
1 egg
1/4 c bacon grease

Place a greased cast iron skillet in the oven. Set to 400 degrees to preheat. Combine the dry ingredients. In a separate bowl combine the buttermilk, egg, and bacon grease. Add wet to dry mixture, mix well. Carefully remove the preheated skillet from the oven and pour in the batter. Bake at 400 degrees until golden brown. Allow to cool slightly before removing, it will come away from the pan easier. Cut with a sharp knife and run knife along the edge to loosen.

Pairs well with black eyed peas or ham & bean soup!

Wednesday, December 29, 2010

Texas Holy Sheet! Cake


Ah, Texas Sheet Cake. Perfectly moist, chocolate-y, rich, and sweet. Its the epitome of Texas hospitality and decadence. Texas Sheet Cake is quick to make, requiring only a good mixing bowl and a spoon, and will delight host and guest alike with its ease of preparation and amazing taste. And it will have everyone who tries it saying "Holy sheet, this is good!"

With New Year's upon us its great to have a cake like this at the ready for unexpected guests or casual get togethers. Read on for the recipe.

Texas Holy Sheet! Cake
(printable recipe)

for the cake:
2 c flour
1/2 c cocoa powder*
1 tsp. baking soda
1/2 tsp. salt
2 c sugar
2 eggs
2 sticks butter, melted and brought to room temp.
1/2 c buttermilk
1 tsp. vanilla
1/2 c water
1/4 c black coffee

for the frosting:
6 tbsp. milk
1/4 c cocoa powder*
1 stick butter
3 1/2 c powdered sugar
1 tsp. vanilla
1 c chopped pecans

*just for sheets and giggles I substituted 1 tbsp. of Hershey's special dark cocoa powder for 1 tbsp. of regular. Use whatever you have on hand, but dark chocolate and I? We have a thing.

Sift the flour, cocoa powder, baking soda and salt together. Add the sugar and mix well.
In a separate bowl beat the eggs until foamy. Add the melted butter, buttermilk, water, coffee, and vanilla. Add the wet mixture to the dry and stir until smooth.
Pour the batter into a greased 10"x15" pan, spread evenly. The pan will be very full, place come foil underneath to catch any drips. Bake at 350 degrees for 20-25 minutes.

While the cake is baking make the frosting. Toast the pecans and set aside.
Combine the milk, cocoa powder, and butter in a saucepan over low heat. Bring to a boil. Immediately remove from heat and whisk in powdered sugar and vanilla. Stir in half the pecans and pour over the warm cake. Gently spread the frosting to cover the entire cake. Sprinkle with remaining pecans.


I know this is hard to resist.
But you must be patient. Allow the cake to cool for at least 30 minutes. Go do the dishes, read a book, take a walk.

Just stop gazing across the room.


Ok enough already, finally slice a heapin' helping and dig in.


Here's my piece, you can have that smaller one on the plate.
Enjoy!

Monday, December 27, 2010

Ham & Bean Soup


I hope you had ham for Christmas, and I hope you have a little left and saved the bone. You'll be so glad you did.

I love this soup, it is seriously comfort in a bowl. It's rich, creamy, and full of ham flavor. It makes an amazing Monday night supper when the temperature drops and there's nothing to do but curl up and keep warm.

This past Thanksgiving I begged my mom to make her out out of this world apricot ham. We devoured it and I took home the prize- I mean the ham bone, along with some leftover sliced ham and lots of other odds and ends. I think we had a few plates of leftovers before I decided the ham had to go. I couldn't tolerate another ham headache*, and froze the slices that were left along with the ham bone.

*does anyone else get these? Headaches from eating ham? My grandmother has them too apparently.

A few weeks later I was craving ham again and pulled out the bone and leftover meat and set it in the fridge to thaw. The next day I whipped up this fantastic soup, its one I look forward to each winter.


Ham & Bean Soup
(printable recipe)

1 leftover ham bone, about 2 1/2 lbs
leftover sliced ham, cubed
4 stalks celery, diced
1 onion, diced
2 cloves garlic, minced
7 c cooked beans, I had a mix of cannellini, great northern, and butter beans
(1 19oz. can cannellini, 2 15oz. cans great northern, and 2 15oz. cans butter beans, drained)
1 29oz. can cream of celery soup
2 c milk
1 tsp. ham base*
pepper to taste

*I have not been able to find this in grocery stores, my uncle kindly ordered me a huge jar from the restaurant supplier they use, its wonderful! You may try Amazon for a similar product, but they do not have the brand I was given.

Take the ham bone and remove as much of the meat at possible, mine had a few cupfuls left clinging to the bone. Cube the ham and set aside, you will need about 4-5 cups.

Add 2-3 tablespoons of oil to a large stock pot on a medium heat. Add the ham bone and turn a few times to brown the remaining fat on the bone. Toss in the celery, onion, and garlic and cook until soft and fragrant. Add 6 cups of water, cover with a lid and boil for 20 minutes to make a quick stock.

Add the cubed ham, beans, soup, milk, ham base, and pepper to taste. You will likely not need any salt. Simmer over medium low heat about 30 minutes. Remove the ham bone, serve with crusty bread, crackers, or skillet cornbread.

Thursday, December 23, 2010

Ojarascas


I have no formal training in the culinary field, (or photography for that matter) and I don't speak Spanish fluently. So from time to time I come across something perplexing. It gets under my skin until I figure it out for myself and make sense of it. Take these cookies, for example.

I've always known these as Ojarascas, (although I also call them sand cookies) and you can find them at Hispanic markets and any panaderia by that name. My mom and I love them, and we'd often pick up a bag along with our pan dulce.

Recently there's been some talk of Mexican Wedding Cookies, which I have had once in my lifetime, and Polvorones which are common in panaderias. Now all three of these are pretty similar, they all have a shortbread kind of consistency and a very basic list of ingredients. My dilemma was trying to figure out what the subtle differences were, how is that wedding cookie like (or not like) my ojarasca? So I did some research, compared recipes, and translated some Spanish. Here's what I've come to conclude, please add your insights in the comments!

Mexican Wedding Cookies - made with butter and powdered sugar, ground nuts are often added to the dough, cookies are dusted with powdered sugar. Melt-away texture.

Polvorones - can be any variation of shortbread cookie. The name comes from the word Polvo, which translates to dust (describing the texture of these treats). I have always known Polvorones to come in different colors, yellow, pink, white, brown and resemble a large sugar cookie. They are also sometimes flavored- orange, chocolate, vanilla, almond.

Ojarascas - made with manteca (pork lard) and granulated sugar, cookies are dusted with cinnamon sugar. Crumbly texture.

Out of the three the Ojarascas are my favorite. I assume the manteca is what sets them apart- Ojarascas are not overly sweet and the cinnamon sugar gives them a delicious flavor. Ojarascas are a great treat anytime but I especially like to make them at Christmas- perfect with coffee or Mexican hot chocolate and they make a wonderful addition to any cookie tray.


Ojarascas
(printable recipe)

6 c flour
1 c sugar
1 1/2 tbsp. cinnamon
1 tsp. cornstarch
1/2 tsp. baking powder
1/4 tsp. salt
1 1/8 c vegetable shortening
1 1/8 c manteca (lard)
1/2 c water

for cinnamon-sugar:
1/2 c sugar
1 tbsp. cinnamon

Combine the dry ingredients and mix thoroughly. Whip the shortening and lard until fluffy. Slowly add the dry mixture. Once half has been added add the remaining in all at once with the water. Knead until the dough begins to come together. Roll out to 1/2" thick on a lightly floured surface. Cut with a small round cutter, place on parchment and bake at 350 degrees for 20 minutes. The cookies will still look pale. Remove them from the pan immediately and roll in cinnamon sugar to coat the entire surface.

Makes 4 dozen, feel free to halve the recipe.

Wednesday, December 22, 2010

Mas Tamales


Hank and I have really gotten bitten by the tamale-making bug this year. We've spread and rolled over 300 (I lost count a while ago) and have been giving them away left and right and also hoarding some for our Christmas Eve party. I thought I'd share ideas and recipes for a few other variations besides the traditional pork.

Chicken Tamales - make these just like Pork Tamales. We cooked 2 whole chickens in the crockpot for about 4 hours, deboned, shredded and seasoned with a puree of ancho and pasilla chiles, garlic, onion, and jalapeños.


Sweet Tamales - I had to try a sweet variety this year. I mixed up a special sweet masa and filled each tamal with plain caramel candies. The candy oozed out a bit but they were still really tasty. Next time I may try a rum-raisin sort of filling. Here's the masa I used if you'd like to try these.

Sweet Masa
(printable recipe)

2 1/2 c masa preparada para tamales*
1/3 c manteca (lard)
1/2 c evaporated milk
1/8 c sugar

*this is a wet dough, usually found in the meat or refrigerated section at Hispanic markets

Whip the lard and gradually add the masa and milk. This may be done in a mixer or the traditional mix-by hand method. Add the sugar and mix well. Taste the masa for sweetness, adding more if necessary.


Spicy Black Bean Tamales - I think I like bean more than pork tamales. Especially if they're bean and cheese. I had a few handfuls of shredded cheddar in our fridge that needed using, and into the tamales it went. Lesson: Anytime you have cheese, add it.

Spicy Black Bean Filling
(printable recipe)

1 lb. dried black beans
1/2 onion, diced
2 jalapeños, minced
1 serrano, minced
1 tbsp comino
salt & pepper to taste

Sort through the beans and place them in a large stockpot. Cover with water (at least 2" over the beans), put the lid on and bring to a boil. Boil for 30 minutes. Carefully drain the water, add fresh water to cover along with a dribble of oil. Cook until tender.
Meanwhile saute the onion, jalapeños, and serrano until cooked through. Spoon the cooked beans into the skillet with the sauteed onion and peppers, mash little by little until all of the beans are incorporated and smooth. Add a little of the cooking liquid if it seems dry. Season with comino, salt, and pepper. Fill tamales, adding cheese if desired.


Chorizo Tamales - I may be in love with these. How can you go wrong with chorizo? And I made use of all that excess grease by adding it to the masa- super tasty. Bonus for being resourceful! The only thing that could possibly be better? Chorizo and bean.


I apologize that these ideas aren't very precise, but tamale making isn't really easy to exact. There's such a large quantity of everything, you really just have to cook and season to taste. It is useful to have a basic masa recipe to expound upon though, just substitute different fat, broth (or water or milk) and spices. Then the filling can be just about anything!

Basic Masa para Tamales
(printable recipe)

5 lb. masa preparada para tamales*
1 1/2 c manteca (lard)
2 c broth
1 tbsp. paprika
3-4 tbsp. chili powder, (try ancho or cascabel)
2-4 tbsp. salt (to taste)

*this is a wet dough, usually found in the meat or refrigerated section at Hispanic markets

Whip the lard and gradually add the masa and 2 c of warm broth. This may be done in a mixer (my KitchenAid will just barely hold it all) or the traditional mix-by hand method. Add the spices and mix well. Taste the masa for seasoning, adding more if necessary.


A lot of our tamale making has been in the evening. By the time we get off of work and get everything ready to roll its already pretty late. Our most recent batch is pictured above, and the aftermath is below.

Beer helps with the cleanup. For serious.


Also, do you see all that leftover masa? It happens. Good news though, it freezes really well. And having it already prepared makes the next batch that much easier.


If you've missed my previous tamale related posts please see below for further info:

Hosting a Tamalada - a few tips and a list of everything you need to have a tamale making party
Pork Tamales - the basics of making tamales, a recipe for traditional pork tamales and visual guide for spreading, filling, and rolling tamales.

Sunday, December 19, 2010

Cinnamon Rum Pecans


These pecans have become a recent Christmas-time must have in our family. My mom requests them each year and her and my dad have been known to hoard them, keeping their stash from my little brother and sister. It's no wonder, these Cinnamon Rum Pecans are wildly addictive, crisp and sweet with warm notes of cinnamon and spiced rum; the perfect seasonal treat. I think I ate 15- or fifty, while I snapped this photo. This year I plan on making a quadruple batch, plenty to munch on (I've been known to hoard them too!) and give to friends and family alike.

Cinnamon Rum Pecans
(printable recipe)

4 c pecan halves
1 egg white
1 tbsp. spiced rum (I like Sailor Jerry)
1/2 c sugar
1/2 tsp.cinnamon

Beat the egg white until foamy. Add the rum and stir well. Toss the pecans and in the egg white mixture to ensure they are evenly coated.
Sprinkle the sugar and cinnamon over the pecans and toss to coat. Spread the pecans on a lightly greased baking sheet in an even layer. Bake at 250 degrees for about an hour, check periodically and stir to make sure they don't stick or become scorched.

Looking for other gift worthy treat ideas? Here are a few that may make it into my holiday goodie bags:

Eggnog Fudge
Chewy Pecan Pralines
Peanut Brittle
Gingerbread Caramels
Bigger in Texas Pillow Cookies

Hopefully I'll have time to share a few more before the end of the week.

Tuesday, December 14, 2010

Pork Tamales


I'll admit, these may seem like a lot of work; and if you're making tamales by yourself, then yes you have your work cut out for you. The best way to make tamales (and the most fun) is to have a Tamalada, invite your friends and family and have everyone take part in the process. Set up an assembly line and start cranking 'em out! You'll have dozens of tamales finished in no time and have fun in the process.

This year Hank and I tackled making the traditional pork tamales way in advance (they freeze extremely well) so it was just the two of us and a very messy kitchen. We may do some other varieties as it gets closer to Christmas.

I started prepping on Friday night by cooking the pork. I don't actually use the pig's head, I prefer to use the pork picnic (shoulder) instead. It fits neatly in my crockpot, yields an impressive amount of meat, and makes its own lard. The next morning I removed the perfectly cooked meat and let the remaining fat and bones simmer for several hours. Everything was refrigerated and waiting to be put together the next day. Sunday I prepared the masa using the lard and broth from the pork, then shredded and seasoned the meat, soaked the husks, and brought Hank in to help roll. Read on for the recipe and how to.


Pork Tamales
(printable recipe)

7 lb. pork picnic, skin on is preferable*
1 onion quartered
6 cloves garlic, crushed
2 bay leaves
1 tbsp. salt
1 tbsp. pepper
8 ancho chiles
corn husks
5 lb. bag masa preparada para tamales**
1 tbsp. paprika

*if skinless add 1 lb. grasa de puerco - cuts of pork fat
**this is a wet dough, usually found in the meat or refrigerated section at Hispanic markets

Begin by cooking the pork in a crockpot overnight. Place the pork (and grasa if needed) in the crockpot and cover with water. Add the onion, garlic, bay leaves, salt and pepper. Cover and turn on low, cook for 8 hours. I do this right before bed and wake up to a house full of pork smell, flip on the ventihood if you're lucky enough to have one (I don't) or crack a window.

The next morning pick through and remove the meat. Refrigerate until ready to use. Keep the crockpot on low and let the remaining fat and bones cook another 4 hours. Strain and refrigerate. The lard will rise to the top and the rich broth will be left below.

When you're ready to finish the filling set a pot of water to boil. Put the ancho chiles in a large bowl and pour the boiling water over. Cover and allow to cool. Reserve the soaking liquid and remove the stems and seeds from the chiles. Puree in a food processor with enough of the soaking water to form a runny paste. Add the paste to the finely shredded pork, season with salt and pepper to taste and mix well. Add a little liquid if it seems dry, I added 1/2 c of the chile soaking liquid and 1/2 c broth.

Soak the husks in water for 30 minutes, add a heavy pot on top to keep them submerged.

To make the masa skim the lard from the chilled broth and measure, you will need 1 1/2 c of lard (can substitute any extra needed with commercial lard). Whip the lard and gradually add the masa and 2 c of warm broth. This may be done in a mixer (my KitchenAid will just barely hold it all) or the traditional mix-by hand method. Add the salt and paprika and mix well. Taste the masa for seasoning, adding more if necessary.

Towel dry the husks and begin spreading, filling and rolling.

Thinly spread the masa with the backside of a spoon on the smooth side of the husk. You can either lay the husk flat on the table or hold it in your palm, whichever works for you.


Don't spread the masa too far, you'll need enough room to be able to fold the end over to close the tamal. I spread this one to about 5" x 4".

Add about 2 tablespoons of pork to the center, roll and fold the end over. If you like tie a spare strip of husk around each tamal to keep it closed. Tying becomes a bit tedious and its not really necessary, but do what you like. I stopped tying after this one.


Now, spread, fill, roll, and repeat. Like 100 times. No really.

Don't forget to roll one that's all masa. That's the trick one, hahaha. I like to put a little dab of meat on the end to really disguise it :)


Place the tamales (open end up) in your biggest steamer.
Cover and place the steamer on the largest burner at the highest heat setting. Steam for about 2 hours until the masa is firm and cooked through. Test for doneness by removing the largest tamal and unrolling slightly. It should be cooked through and easily separated from the husk.

Remove the tamales and eat immediately or freeze dozens or half dozens in foil. Serve with chili con carne, tomato sauce, or salsa. Makes 100 tamales.


Extra tips!
  • Have plenty of newspaper handy. Your masa spreading area will get messy and need fresh paper from time to time.
  • Protect your table. Hank refinishes furniture, and so I must tell you if you're setting up assembly on your wood table lay a plastic table cover over the top and then several sheets of newspaper. A shower curtain liner works too.
  • That steamer is going to get heavy. Place it in a sturdy chair at the end of the table as you assemble and fill it up. Also go ahead and fill it with water now, or be sure to leave a space where you can fill it once its on the stove.
  • My great-grandmother always used paprika in her masa for color, you could also reserve some of the ancho paste to add to the masa instead.
  • Another great-grandmother tip (via my mom): Gross as it sounds you must taste the raw masa. If its bland raw it'll be bland when its steamed.
  • Aim for consistency. Its a good idea to have only one person doling out the meat. Their responsibility is to make sure the meat to masa ratio is perfect, and to make sure there's enough meat filling to go around.
  • Get the whole family involved. As a kid for years I was tasked with drying the husks, then eventually allowed to spread masa. Masa spreading can be slow work so several people should be spreading while one person fills. Kids can get it on the fun by drying husks or tying up finished tamales.
  • If the husk is too big simply tear away the excess. If its too small put it together with another small husk to make it the right size. Just overlap them about 1/2" and use masa to help hold it together.
Share your tamale making tips in the comments!

Friday, December 10, 2010

Pinto Bean Pie


I know, weird right? Strange though it may be this Pinto Bean Pie has been tempting me for months. I'd stumbled upon a few variations in different mother's association cookbooks, even one from Hank's hometown of Breckenridge, TX, and finally decided it was time to give it a try. The recipes I found seemed like they would be overly sweet and needed some adjustment, so I ran with my ideas and came up with this lightly sweetened pinto bean filling, baked it up and used the leftover egg whites to make a simple meringue for the top. I had planned to surprise my folks and have them guess what kind of pie this was, but Hank spilled the beans (ha!) before I had the chance.


Pinto Bean Pie
(printable recipe)

1 unbaked pie crust
2 c cooked pinto beans (if using canned beans drain well)
2 tbsp. butter, melted
1/2 c sugar
1/2 c milk
2 tbsp. molasses (optional)*
1/8 tsp. cinnamon
1/8 tsp. allspice
1 tsp. vanilla
3 egg yolks

for the meringue:
3 egg whites
1/4 tsp. cream of tartar
1/2 tsp. vanilla
3 tbsp. sugar

*the molasses does impart a strong flavor. If you particularly like molasses by all means add it, if not leave it out.

Mash the pinto beans thoroughly with the melted butter. Add the sugar, milk, molasses and spices. Separate the eggs and lightly beat the yolks, add to the bean mixture. Mix well and pour into an unbaked pie crust. Bake at 350 degrees for about 40 minutes. You may need to cover the crust to prevent it from burning.

While the pie is baking make the meringue. Beat the egg whites, cream of tartar and vanilla until soft peaks form. Add the sugar 1 tablespoon at a time and beat until stiff peaks form. Once the filling has set spoon the meringue on top and brown in the oven.


In doing some research I found that the origins of this pie are a bit hazy. I had assumed it was dreamed up in Texas... where else would a pinto bean be so revered as to make it into a pie? Anyways, I like to think Pinto Bean Pie was a good solution in the old days, when winter reared it's ugly head and fruit was scarce, the dried pinto bean was plentiful. It certainly makes a delicious (and economical!) pie.

Wednesday, December 8, 2010

Buñuelos


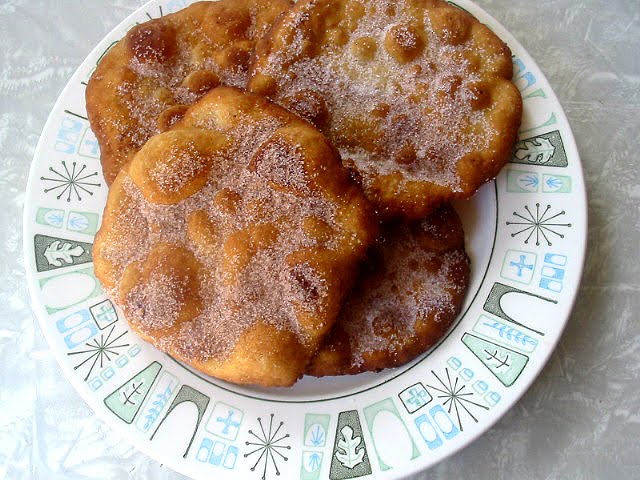
Buñuelos have always been a staple at our family Christmas Eve gathering. Among all the treats on the table they were always my favorite - perfectly crispy and dusted with cinnamon sugar. Delicious with a cup of coffee or Mexican hot chocolate.

There are two ways to make buñuelos, one is kind of cheating and the other is really the proper way to do it. Both are good although doing things the hard way does have an edge where taste is concerned.

The shortcut is to take pre-made flour tortillas and fry them in hot oil, they will puff slightly and turn golden brown. Immediately remove from the oil and dust with cinnamon sugar. These are good, really easy, and quick (also a great way to use up leftover tortillas). I like to use these "quick buñuelos" as a garnish for an easy ice cream sundae.

The other method involves making a sweetened tortilla dough from scratch, rolling them out, and frying in oil. These taste a lot fresher and have a much better texture and flavor. Try these for Christmas or anytime you need a tasty treat with your coffee.


Buñuelos
(printable recipe)
adapted from La Paloma White Wings Brand

1 egg
1/3 c milk
2 c harina preparada*
2 tbsp. sugar
2 tbsp. butter, melted
oil for frying

for cinnamon sugar:
1/2 c sugar
1 tsp. cinnamon

Beat egg well and stir in milk. Gradually add the harina preparada and sugar. Add butter, turn onto a lightly floured surface and knead until smooth (3-5 minutes). Divide the dough in half, then in half again, then make 3 balls of dough out of each piece, for a total of 12. Roll out to 6" in diameter. Brush off any excess flour (this will keep your oil as clean as possible). Fry in at least 1" of oil heated to 375 degrees until browned on both sides. Remove from the hot oil and drain on paper towels, dust immediately with cinnamon sugar.

*if you can't find harina preparada use 2c flour, 3/4 tsp baking powder, and 1/2 tsp. salt instead

Tuesday, December 7, 2010

Queso Flameado


The first time we tried Queso Flameado was at Tejano Restaurant in Oak Cliff. It was also our first time there, Hank and I spied it on the menu and wondered how we had never had it before. Chorizo and gooey cheese served with fresh tortillas? Yes, please, and thank you.
But upon tasting it, it was just ok. Our cheese cooled off quickly and the chorizo was far too greasy, making for quite a mess. I knew it could be made better at home.

First adjustment- cast iron skillet. Cast iron has great heat retention, keeping your cheese nice and melt-y. (you could also use a hot plate) Next- the chorizo, buy the best quality store brand you can find, or make your own. And finally lets add some peppers, I like topping it with sauteed poblano, jalapeño, and onion for extra flavor. Queso flameado makes a great snack or simple dinner with a side of rice and beans.


Queso Flameado
(printable recipe)

12 oz. chorizo (or an equal amount of homemade)
1/4 c diced onion
1 poblano, diced
1 jalapeño, seeds removed and minced
1 large clove garlic, minced
1-2 c grated asadero, queso quesadilla, or monterrey jack cheese

Cook the chorizo in a cast iron skillet until done. Remove the chorizo and set aside, remove any excess grease from the pan. Sautee the onion, garlic, poblano, and jalapeño in the leftover grease until softened and fragrant. Remove half of the pepper mixture and set aside.
Stir the chorizo in with the remaining pepper mixture. Top with shredded cheese and reserved peppers.

Bake at 325 degrees for about 10 minutes until heated through and bubbling. Serve with fresh tortillas (or very sturdy chips).

If you need this to feed a crowd, or are just running low on ingredients spread a layer of refried beans on the bottom, it will absorb all the flavor and make the dish go even further.