Pages
▼
Sunday, October 31, 2010
Friday, October 29, 2010
The Hungry Texan's Ultimate Italian Sub
It's no secret that I love Italian food. If I hadn't been born Hispanic I would pray to be born Italian. I love pasta, pizza, and all the cheeses, sauces, and delicious deli meats. Jimmy's Food Store is one of my favorite spots in town to stock up on the good stuff. They have just about everything you'd need to make a gourmet Italian meal, or make one mean Italian Sub.
Enter this sandwich. I call it the Hungry Texan's Ultimate Italian Sub. It can feed 4 men (with hearty appetites) and definitely lives up to its name with layers upon layers of meat, cheese, and various roasted and pickled condiments. It's the perfect sandwich to take to a picnic, potluck, or even tailgating... Even though I'm not really into sports I'm sure some of you out there are following the World Series, Go Rangers! Watch the game(s) and chow down on this sandwich.
the Hungry Texan's Ultimate Italian Sub
(printable recipe)
1 large round loaf, about 10" in diameter
1/2 lb. mortadella
1/2 lb. capicola
1/2 lb. genoa salami
1/2 lb. prosciutto di parma
1/3 lb. provolone
1 jar (16 oz) olive salad (I use Boscoli)
1 jar (7 oz) roasted red peppers, sliced
1 jar (12 oz) marinated artichoke hearts, drained & chopped
1 jar (12 oz) mild banana peppers, sliced
Carefully slice the loaf in half to form a large bun. Scoop out the insides (top and bottom) to make a large cavity for the filling. Begin layering the various meats, cheese, and condiments. It helps to lay everything out assembly line style and layer in order, making sure to get everything evenly distributed. Be sure to use all the meat and cheese, you'll likely have extra condiments (these can be served on the side if you like). Once the loaf has been filled and topped off wrap it tightly in plastic wrap. Put a heavy pan over the top to weigh it down and chill the sandwich for at least 4 hours to let the flavors come together. Unwrap, slice in wedges, and drizzle with balsamic vinegar.
Thursday, October 28, 2010
Homemade Cracker Jack
Here's a great last minute snack to make for your Halloween festivities: Homemade Cracker Jack.
I remember eating lots of Cracker Jack as a kid. There was something about that simple cardboard box, the sweet and crunchy popcorn, and the thrill of the prize inside. It was always one of my favorite treats. I still love Cracker Jack but I can never seem to find it in the nostalgic paper box, and the prizes? meh. The last time I got one it must've been a temporary tattoo... what happened to the toys?! I digress, but the crunchy, sweet, salty, popcorn is still just as good. Although these days, I pull out a handful of pantry staples and make my own. (with extra peanuts!)
Homemade Cracker Jack
(printable recipe)
3 tbsp. canola oil
1/2 c un-popped popcorn
1/2 c (1 stick) butter
1 1/2 c dark brown sugar*
1/2 c corn syrup
1 tsp. salt
1 tsp. vanilla
1/2 tsp. baking soda
1 c salted peanuts
Heat the canola oil over a medium high heat with 3 kernels of corn. When they pop add the remaining popcorn and cover, leaving the lid propped open (to allow steam to escape). Shake the pot until all the popcorn has popped, about 2-3 minutes. Remove from heat and set aside.
Melt the butter in a large sauce pan, stir in sugar and syrup. Bring to a boil, stirring constantly to dissolve sugar. Cook 8 minutes and remove from heat. Stir in salt, vanilla, and baking powder (stir quickly and carefully as the syrup will foam up!) Stir in the peanuts and popcorn, make sure they are coated thoroughly. Spread the mixture out on a greased baking sheet to cool completely.
It will look glorious and irresistible. Sneak a quick taste, its ok. Just don't burn yourself!
Once it has cooled break apart into clusters or bite size pieces. Keep in a ziploc bag, stays fresh for at least a week! (if it lasts that long)
*Use dark brown sugar for that familiar Cracker Jack taste. Use light brown sugar if you're not a big fan of molasses, it will still taste great!
Chicano Pop Art by Patrick Murrilo
I may have to buy some of these paintings or prints, I love this artist's style - so colorful and vibrant. Very Posada inspired.
Chicano Pop Art by Patrick Murrilo
Wednesday, October 27, 2010
Dia de los Muertos
Dia de los Muertos is fast approaching, if you haven't figured out what you're making or need a little inspiration, look no further. Here's everything I featured this month that would be perfect to make to celebrate and honor the dead.
Pan de Muertos
Capriotada
Mole Poblano
Chicken Mole Enchiladas (Enmoladas)
Sugar Skulls
Atole de Arroz
Paper Flowers
Pumpkin in Syrup
Also I wanted to share my take on a traditional altar that I created for my dog Jack. Making altars for dogs may differ from the norm, but he was such a big part of our family it only seemed fitting to honor him this year.
I draped the table (and several boxes) in a colorful throw and set out bouquets of paper flowers, candles, and sugar skulls. It is believed that the dead need nourishment after their long journey home so food and water are always placed on the altar. I have the traditional pan de muertos and tamales, I also set out marranitos which he always begged for, and of course a bowl of kibble and his water dish.
The aroma from the flowers and incense (usually copal) is said to be consumed or used by the spirits. They also consume the essence of the food, it is later eaten by the family or given away even though some believe it has no nutritional value.
I have also brought out a few of Jack's things, his collar and tag and a favorite toy we called the "skunk ape".
Just putting this all together was a great experience and a wonderful way to celebrate and remember Jack's life. I love the Dia de los Muertos tradition in that it is a positive view of death, it is not feared or viewed as the end of life. The dead are honored and celebrated, and it is a time for families to come together to tell stories and remember the happy times they shared with their departed relatives.
For more information on Dia de los Muertos and its traditions, food, and practice see the links below:
AZCentral
List of Books for further reading
Palomar College Site for the Dead
Wikipedia
Tuesday, October 26, 2010
Capriotada
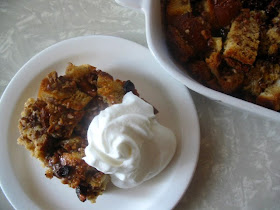
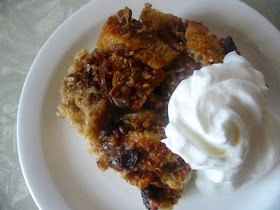
My recipe for Pan de Muertos makes a fairly large loaf, and as much as Hank and I love it we always find it difficult to finish while its still moist and fresh. My solution? Make Capriotada with the leftovers.
Capriotada is a Mexican Bread Pudding that is traditionally made during Lent. It often contains raisins, nuts, and cheese and is drizzled with a sweet syrup. There are many different variations of capriotada, this is how I've started to make it. I like to use Pan De Muertos for the bread, as it is only slightly sweet. You can also use brioche, or try conchas or even french bread will do. You may want to adjust the sweetness based on the bread you're using. I don't include any cheese in my variation but I would like to try it. Feel free to add or adjust the components to make it your own or use what you have on hand.
Capriotada
(printable recipe)
for the syrup:
4 oz piloncillo (about 1/2 of a cone) or 1/2 c dark brown sugar
2/3 c water
6 cloves
1 cinnamon stick
2 tbsp. dark rum
for the filling:
about 3/4 pan de muerto, cubed*
2 tbsp. butter
1/4 c raisins
1/2 c chopped pecans
for the egg mixture:
4 eggs
3/4 c milk
1/4 tsp. nutmeg
1/4 tsp. cinnamon
Heat the piloncillo and water over low heat until the sugar has dissolved. Add the spices and bring to a low boil. Simmer about 5 minutes.
Use the 2 tbsp. of butter to grease a 9x13 pan. Layer the bread in the pan and dot with the remaining butter. Top with raisins and pecans.
Whisk the ingredients for the egg mixture together thoroughly. Pour over the bread. Strain the syrup and pour over the top. Cover and allow to soak for 10 minutes.
Bake at 350 degrees for 20-25 minutes. Capriotada makes a great breakfast or dessert. Serve warm topped with whipped cream or vanilla ice cream.
*enough to fill a 9x13 pan, about 2" deep
Pollo Regio
Ahh Pollo Regio, I love to drive by there and just inhale the chicken scented smoke wafting from the smokestacks. It's pretty glorious. And makes me instantly hungry.
Hank seems to get something different each time we go. This time the quesadilla.
Me? The first thing I tried there was this Tostada Siberia. As big as your face and stuffed with chicken, crema, and an avocado sauce. I love it because I just pile on the salsa and munch on the jalapeno and it reminds me of eating fried chicken minus the bones and grease. Also the tostada shell stays crisp. Even after spending a day as leftovers in the fridge. Rad.
The salsa bar at Pollo Regio is expansive and tasty. You don't see too many places that have the pickled onions, those are a treat in and of themselves.
Paper Flowers
If you are preparing for Dia de los Muertos you may be looking for marigolds for your ofrenda. Marigolds, or cempazuchitl, welcome the dead and help them on their journey. The petals are often used to make a trail from the cemetary to the family home and whole flowers are made into garlands and decorative arrangements. Families will often grow marigolds in their garden to prepare for the holiday. If fresh flowers are not available paper flowers can be made to symbolize the real thing.
Here is a simple to tutorial on how to make paper flowers, this is the same thing you may have learned in kindergarten. Its simple fan folding and cutting but the results are really very pretty. Marigolds come in different shades of yellow, orange, and gold so use what you like or try different colors for more variety.
Begin by cutting rectangles out of tissue paper. They should be twice as long as they are wide. Mine were roughly 3.5" x 7", but you can make them larger (as in the photo at the bottom). Stack 4 sheets together and begin fan folding, making 1/4-1/3" folds.
Gather the folds and twist a 7-8" length of wire around the center. I was able to find green floral wire at a craft store that bends very easily. If you can only locate plain wire 20 gauge is about right for this project. Once the wire is secure cut out a rounded shape on each side.
Then open up the folds on both sides of the wire. Begin pulling up each layer one at a time to create the petals. Shape them as you go along by gently twisting and turning the paper so it curls around itself. Once all the layers are separated I pull them all together from the bottom to shape the entire flower. You can also shape the wire stem or wrap it in green tissue paper if you like.
Now that I've made dozens of these flowers I'm of course looking for other ways to use them. I think they make great napkin or placeholders and would be really pretty to tie around a gift bag or box and use like a bow. Anyone have any other creative ideas for these?
Monday, October 25, 2010
Atole de Arroz
I'll always have fond memories of my dad's Atole de Arroz. As a kid on Sunday mornings I could hear the bubbling pot of rice and smell the sweet cinnamon-milk aroma that wafted through the house. I could hardly wait for a bowl of warm, creamy atole and would often go in the kitchen to peek and see if it was ready yet.
My dad learned to make Atole de Arroz as a boy by watching his mom prepare it for them on the weekends. It has always been a favorite of his too. The only thing my family debates about is whether they prefer the atole warm or chilled. I must admit I like both, but always find the warm atole especially comforting for breakfast on a cold day.
Here's how I make it, with substitutions noted below:
Atole de Arroz
(printable recipe)
1 1/2 c white rice
3 c water
3 c almond milk*
3 cinnamon sticks
1/4 c sugar
*Don't be like me (and try to save a few calories). Use real milk. Use what my dad uses: 1 can evaporated milk and the rest whole milk. You'll thank me later.
Cook the rice in 3 cups of water to yield about 4 cups cooked rice (cook this any way you like or use leftover rice. I cheat and use a rice cooker) Combine the milk, sugar, and cinnamon sticks over low heat. Bring to a low boil for about 5 minutes. This will infuse the milk with the cinnamon flavor and make your kitchen smell wonderful. Add the cooked rice and simmer for another 5 minutes until thickened. Add additional sugar if needed.
Sugar Skulls
I'm so excited to finally post these, I've been really really determined to make sugar skulls for Dia de los Muertos. Last year I purchased some fancy skull molds and the holiday came and went without any sugar skulls in sight. I think I got caught up in the recipe, every one I saw required meringue powder and I could not find any to save my life.
This time around I thought I'd try to make these with egg whites, after all meringue powder is made from dehydrated whites and I had a few leftover from making pan de muertos.
But then I hit a brick wall when I could not find those pricey skull molds I bought. They had vanished into the abyss of my kitchen storage (or did I purge them or lend them out? who knows.) so I had to figure out an alternative. Luckily I had a bunch of eggshells, also from making this and they wound up working perfectly.
The best part about all this is there's no fancy equipment or special ingredients needed. You can make these with what you've already got in your kitchen. Read on for the procedure and recipes (Note: These are NOT edible).
Sugar Skulls
2 c sugar
1 room temperature egg white
egg shells or skull molds
Beat the egg white for 3-5 minutes on high until foamy. Start by adding 2 tablespoons of the foam* to the sugar and mix well to combine. You want the sugar to reach the consistency of wet beach sand, it should hold its shape when pressed or squeezed. Add a bit more of the foam if needed.
*Be sure you are only adding foam and not liquid to the sugar, otherwise it may become too wet. Try to skim the foam from the top (there will still be liquid egg white underneath).
Make sure the egg shells (or molds) are clean and dry before filling. Fill each to the top and press down to pack in the sugar. Allow them to dry for at least 24 hours. Also do not attempt to make sugar skulls on a humid day, the sugar will not set.
After they have been allowed to dry turn the shells over and tap the sides with the edge of a spoon to crack the shell and release the sugar. They should come out easily but the shell may need to be broken off.
Lay the skulls out with their flat sides down, then start sculpting. Don't worry. This is not as difficult as you might think. I used a grapefruit spoon to flatten, scrape, and chisel out very primitive skull shapes. The sugar comes away easily and within a few minutes you've got a basic shape that will be perfect to decorate however you'd like.
Once these are all sculpted you'll need to get decorating. Royal icing is your best bet for decorating these, it dries hard and can be colored fairly easily. While you're at it grab a few little embellishments if you like. Beads, bits of paper, and sequins are great to add color and visual interest.
Royal Icing
4 c powdered sugar
3 room temperature egg whites
1/2 tsp. cream of tartar
food coloring
Add all ingredients and beat slowly until combined. Beat for 7-10 minutes until shiny and stiff.
I divided the icing and tinted it green, blue, yellow, and pink (I also left some white) using a few drops of food coloring. Spoon the icing into small ziploc bags and cut a tiny piece off the corner to form a makeshift pastry bag. Royal icing starts to dry as soon as its made so don't leave it sitting out. Its also a good idea to keep a wet towel handy to clean up any messes as you decorate.
Add features to each of the skulls and any extra embellishments you might want. Let them sit out for a few minutes to dry completely.
Sugar skulls are beautiful on a traditional Dia de los Muertos altar but they would also make great favors or place settings for a party. In the photo below I've simply glued the skull in the center of a paper flower. The paper flower tutorial will be posted soon.
Friday, October 22, 2010
the Hungry Texan on Pegasus News
Check it out, I'm featured on Pegasus News today!
Meet Dallas Blogger Sylvia Subialdea of Hungry Texan
Be sure to check Pegasus News each Friday as they feature a new Dallas food blogger, its been so interesting to read about everyone so far. Many thanks to Teresa for the write up!
Real Texas Chili
So. I knew the day would come when we’d have to talk chili. To be honest, I haven’t been looking forward to it since it’s always a sticky subject. How does this humble dish cause so much controversy? Why is it such a big deal how you make it? What makes us Texans boo and hiss at anything that’s not Real Texas Chili? Well, it just so happens to be our official state dish. And its because of this, and a Texan’s natural aversion to all things “Yankee”, that causes us to defend it’s purity. So it’s my duty as a Texan thru and thru, to reinforce the fact that Real Texas Chili has no beans. Or tomatoes. Or any fancy stuff. Its as thick and heavy as the cast iron it’s cooked in. And as full-flavored and feisty as the Texas beef it’s made from.
Here’s how I make it... I like to think its as close as possible to how it must’ve been made in the early days while on the cattle trail- coarsely chopped meat, pre-ground spices (likely ground in a ranch house kitchen or purchased Gebhardt’s) and slow cooked over a fire.
Real Texas Chili
(printable recipe)
4.5 lbs. chuck steak
3 tbsp. manteca (lard)
1 large onion, chopped
2 tbsp. fresh minced garlic
2 tbsp. comino
3 tbsp. chili powder
1/2 c black coffee
2 tbsp. paprika
1-2 tsp. cayenne
2 tsp. salt
2 tbsp. ancho chili powder
2 tbsp. cascabel chili powder
1 tbsp. masa harina
Coarsely chop the chuck steak into 1/4 - 1/2 cubes. Toss with the comino, chili powder, and garlic.
In a large cast iron dutch oven (preferably over a fire / coals) heat up the manteca and sautee the onion until it begins to soften. Add the meat and stir until it begins to brown. Add the remaining spices, black coffee, and 1 1/2 c water. Cover and simmer over medium - low heat for 1 hour. Check the chili periodically and stir. If it seems too dry add a bit more water but not enough to make it runny. Combine the masa harina with 1/2 c warm water until thoroughly combined, add to the chili and cover. Continue to simmer 1 hour. At 2 hours of simmering the meat will begin to shred when stirred. I like to pull it off the heat at this point, and keep the chunky texture intact. Add additional spice as necessary to suit your taste.
I always like to delve into the traditions and history of what I cook. It makes the everyday stuff a little bit more special I think. In my research I found so many tidbits and tales about chili and its origins, from the San Antonio Chili Queens to the first Chili Powder, there's certainly lots of great information out there:
Chili History
International Chili Society
Chili Appreciation Society International
Wednesday, October 20, 2010
Pumpkin in Syrup
Each year when we visit our local "pumpkin patch" I'm always amazed at all the different varieties. White pumpkins, black pumpkins, striped pumpkins, pumpkins with warts, and lots of colorful little gourds. It's a good way to kick off Fall and remind myself that the season is really here, despite feeling like it was just July a few weeks ago.
Hank and I loaded up on a few varieties, some for carving, some for baking, and a few festive gourds for our table. I quickly snatched up a couple of the Pie Pumpkins with this dish in mind. Pumpkin in Syrup, or Calabaza en Tacha, is commonly prepared for Dia de Los Muertos. It is traditionally made with piloncillo, a raw unrefined sugar, but works just as well with dark brown sugar.
Pumpkin in Syrup (Calabaza en Tacha)
adapted from a vintage cookbook, Historic New Mexican Cookery
(printable recipe)
1 4-5 lb pie pumpkin
2 lbs. piloncillo (or dark brown sugar)
6 cinnamon sticks
4 cloves
juice from 1 orange
3 1/2 c water
Cut the top off the pumpkin and scoop out the seeds and stringy flesh. Cut into cubes and remove the outer skin.
Combine the remaining ingredients in a large stock pot. Bring to a boil, making sure the sugar is dissolved completely. Reduce heat and carefully place the pumpkin in the syrup. Cover the pot with a lid and simmer for 20-30 minutes. The pumpkin is ready when it appears glazed and golden brown. Turn off the heat and allow to cool before removing. Serve with cold milk and additional syrup if desired.
This dish doesn't photograph well, but it's quite tasty. Pumpkin in syrup makes a delicious breakfast or simple dessert served with fresh whipped cream.
Grandpa's Potato Salad
One of the great things about living in Texas is that the weather is usually mild and we can barbecue pretty much year round. And we do. So there's always a need for great side dishes to go with all that delicious smoked meat. If you've got the beans covered, you'll probably need a creamy potato salad to go along with it.
We make 2 types of potato salad in my household. There's my fresh dill potato salad, and the family favorite, my Grandpa's Potato Salad. Its an old fashioned variation that relies on sweet pickle relish for taste and a dash of mustard for color. Pimentos, sliced black olives, celery, and hard boiled eggs add texture and southern flavor. Try this at your next family potluck or barbecue, its sure to become a favorite.
Grandpa's Potato Salad
(printable recipe)
6 large russet potatoes, peeled and diced
2 stalks celery, diced
1 (15 oz) can sliced black olives, drained (about 1 c)
1 (4 oz) jar pimentos, drained
8 hard boiled eggs, chopped
3-4 tbsp. sweet pickle relish
1/2 - 3/4 c mayonnaise
dash mustard
salt, pepper, and garlic powder to taste
Bring a large pot of water to boil, add the potatoes and boil for about 20 minutes until they are just fork tender. Do not overcook, or they will fall apart in the salad. (If you overcook the potatoes, drain them well and make a whipped version of this salad) Drain the potatoes in a colander, allow them to cool for about 10 minutes while you prep the remaining ingredients.
Combine all in a large bowl, start with about 1/2 c mayonnaise and add more if needed. (Everyone seems to have their own preference on how much dressing is used) Add seasonings to taste, chill 3-4 hours. This is best eaten cold, and makes great leftovers too!
Tuesday, October 19, 2010
Sweet Potato Butter
October seems to be flying by, doesn't it? I promised myself I would share this Sweet Potato Butter with you before the month was out, and I will even if it means this post will be a bit short. So without further ado, check out the recipe below from Stephen Palmer Dowdney's Putting Up (one of my fave books for canning recipes). Sweet Potato Butter would be perfect to prep now and have on hand to make pies for the holidays, don't you think?
Sweet Potato Butter
adapted from Putting Up
(printable recipe)
4 c sweet potatoes, cooked, peeled, and mashed (3 lbs sweet potatoes)
3/4 c apple juice
1 c light brown sugar
1 c sugar
1/2 c orange juice
1/2 c lemon juice
1/4 c cider vinegar
2 tsp. cinnamon
1 tsp. vanilla
1 tsp. salt
Cook the potatoes in the oven or microwave until soft, peel them and puree them in a food processor with the apple juice until smooth. Place in a pot with remaining ingredients and bring to a low boil for 10 minutes. Process in a hot water bath for 20 minutes. (see Canning Basics) Makes 3 pints.
Sweet potato butter is great on sandwiches, (I like to add it to a peanut butter banana sandwich) and delicious slathered on grilled meats. It can also be used as a pie filling as I mentioned above. Here's how to do it: Add 1 beaten egg to a pint jar's worth of sweet potato butter and fold in thoroughly. Pour into a half baked pie crust and bake at 350 degrees for 20-30 minutes.
Monday, October 18, 2010
Saturday, October 16, 2010
Pan De Muerto
Each year I look forward to making Pan de Muerto, it's always one of the first things in my oven after the summer baking hiatus. Pan De Muerto is a rich egg bread, subtly flavored with anise and brushed with a sticky sweet orange glaze. It’s delicious with coffee and I imagine it would make great french toast.
Pan de Muerto, or Bread of the Dead, is made as an offering and set out on the altars on Dia de los Muertos. It is said that the dead need nourishment after their long journey home, so families will make different dishes including mole, pan de muerto, and anything else they may have enjoyed in life.
Pan De Muerto
adapted from Cocina de la Familia
(printable recipe)
4-5 c flour
2 packages active yeast
2 tbsp. anise seeds
2 sticks (1 c) butter, melted
6 egg yolks, beaten
2 whole eggs, beaten
heaping 1/2 c sugar
1/2 tsp. salt
for the glaze:
juice from 1 large orange
1/4 sugar
1 tsp orange zest (optional)
Steep the anise seeds in 1/4 c boiling water until cool, about 15 minutes. Dissolve the yeast in 1/2 c warm water.
Pour the anise seeds (and liquid), yeast, melted butter, sugar, eggs, and salt into a large bowl. Gradually add the flour 1 c at a time until the dough begins to pull away from the sides and forms a slightly sticky ball. Knead for 10 minutes on a floured surface.
Spray a large bowl with nonstick spray and place the dough in the bowl, cover with plastic wrap and allow to rise in a warm place until doubled, about 1 1/2 hrs.
Turn out the dough and pinch off a few pieces to make the decorative top. Form the rest into a nice round and top with pieces of dough arranged to resemble bones with a knob center. Lightly cover with plastic wrap and allow to rise 1 hour. Bake at 375 degrees, about 45 minutes.
For the glaze: Combine the juice, sugar, and zest over low heat until the sugar has dissolved. Bring to a boil for 2 minutes. Remove from heat and brush onto the bread. Dust the entire loaf with sugar (you may need to rub it on to adhere to the sides). I was running low so I opted not to with this loaf but it does add a bit of extra sweetness and texture. Allow the bread to cool before slicing.
Thursday, October 14, 2010
Stuffed Chayote Squash
Its finally starting to feel like Fall here in Texas with cool mornings and just barely chilly evenings. I'm ready to indulge in warm, comfort foods like these Stuffed Chayote Squash.
These stuffed chayotes are a great way to use up all of the squash in the markets right now. If you can't find chayotes, you can use calabasitas or even yellow squash, just adjust the cooking times to make sure they don't get too soft.
Stuffed Chayote Squash
adapted from Cocina de la Familia
(printable recipe)
3 chayotes
1 lb. chorizo
1/3 c chopped onion
2 cloves garlic, minced
2 cloves garlic
handful chopped parsley
1 tomato, chopped
1 c bread crumbs
2 tbsp. melted butter
shredded queso quesadilla or other melting cheese*
Boil the chayotes in salted water until tender, about 30-40 minutes. Cut in half and remove the seeds and scoop out the pulp to form a cavity for the stuffing. Chop the pulp and set aside to use in stuffing.
Cook the chorizo in a skillet, add onion and garlic and cook over medium heat about 10 minutes, until soft. Stir in the tomato, and cook for 2 minutes until the tomato starts to break up. Add the chayote pulp and parsley. Season to taste with salt & pepper. Fill the chayotes with the stuffing mixture.
Combine the bread crumbs and melted butter. Sprinkle cheese over each and top with bread crumb mixture. Bake for 15 minutes at 350 degrees.
*the original recipe called for 6 oz. of queso fresco. I didn't have any on hand so I used queso quesadilla. If you opt to use the queso fresco, mix it in with the breadcrumbs and use to top the squash.
This is a great side dish to serve alongside a more elaborate meal like chicken in mole sauce, or eat as a light lunch.
Wednesday, October 13, 2010
Theo's Drive In
I wish there were more places around like Theo's. Its a great little drive in burger spot that Hank and I discovered in Grand Prairie, just a few miles down the road from us. Two years ago we took a drive to snap some photos of the cool 1950's googie-style signs on the main drag and happened upon this place. Not only do they have a great sign and what looks to be the original building and menu (with modestly updated prices) they serve up a mean (and messy!) chili cheese burger.